



Paper Carrier Tape Packaging Process: Step-by-Step Guide for SMT Components
The paper carrier tape packaging process plays an important role in modern electronics manufacturing. For small surface mount components such as chip resistors, MLCC capacitors, compact inductors, and other passive components, stable packaging is essential for smooth SMT assembly. A well-designed paper carrier tape package does more than hold components in place. It helps protect parts during handling, keeps component orientation consistent, supports automated feeding, and reduces production interruptions.
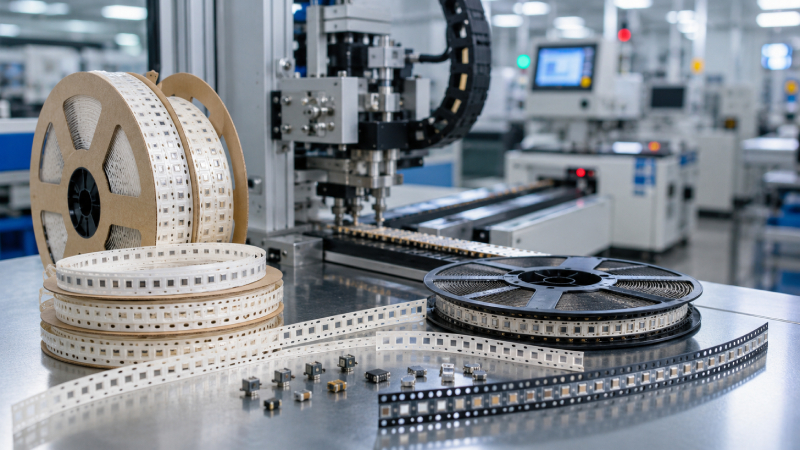
For buyers, engineers, and sourcing teams, understanding how the process works can make supplier selection much easier. When the tape material, cavity design, cover tape sealing, and final inspection are properly controlled, components can move from packaging to SMT placement with fewer risks. This guide explains the complete paper carrier tape packaging process and what to check before choosing a supplier.
What Is Paper Carrier Tape Packaging?
Paper carrier tape packaging is a tape-and-reel packaging method used for small electronic components. Components are placed into punched cavities in a paper-based tape, covered with a sealing tape, and wound onto reels for automated assembly equipment. During SMT production, the reel is loaded into a feeder, the cover tape is peeled back, and the pick-and-place machine removes each component from the cavity.
A complete paper carrier tape package usually includes the paper carrier tape, punched cavities, sprocket holes, bottom support layer, cover tape, reel, leader section, trailer section, and product label. Each part has a practical function. The cavities position the components, the sprocket holes allow accurate machine feeding, the cover tape keeps parts secure, and the reel allows convenient storage, transport, and automated use.
Paper carrier tape is commonly used for small passive components because it is cost-effective, stable, and suitable for high-volume packaging. However, the final choice still depends on component size, shape, sensitivity, and feeder requirements.
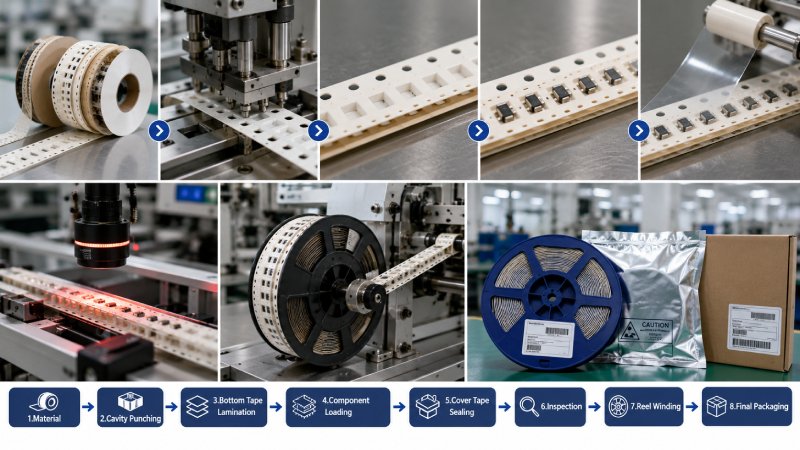
Step 1: Reviewing Component and Packaging Requirements
Every reliable paper carrier tape packaging process starts with requirement review. Before designing the tape, the supplier needs to understand the component itself and how it will be used in production.
Important details include component length, width, thickness, tolerance, weight, polarity, orientation, surface sensitivity, and quantity per reel. The supplier also needs to know whether the customer has a specific tape width, pitch, reel size, ESD requirement, or packaging standard.
This step is especially important when the component has a strict orientation requirement or unusual shape. If the design is based only on approximate dimensions, the cavity may not hold the component correctly. A good supplier will usually ask for a component drawing, datasheet, or physical samples before confirming the final packaging design.
Step 2: Selecting the Right Paper Carrier Tape Material
Material selection directly affects the stability of the final package. Paper carrier tape must have the right thickness, stiffness, surface quality, and dimensional consistency. If the material is too weak, it may deform during punching, winding, or SMT feeding. If it is too rigid or uneven, it may affect cavity quality or machine compatibility.
The material also needs to support clean punching. Poor material quality can create rough cavity edges, dust, or paper fiber contamination. For electronic component packaging, cleanliness and consistency are important because even small defects can affect component seating or feeding performance.
The goal is to select a paper material that can maintain stable cavity shape, smooth tape movement, and reliable reel winding throughout storage, transportation, and production.
Step 3: Cavity Design and Punching
Cavity design is one of the most critical stages in the paper carrier tape packaging process. The cavity must be large enough for smooth component loading but controlled enough to prevent excessive movement. If the cavity is too tight, components may be difficult to load or pick up. If it is too loose, components may tilt, rotate, or shift inside the tape.
Key cavity design factors include pocket length, pocket width, cavity depth, component clearance, pitch accuracy, and sprocket hole alignment. The cavity should support stable component positioning while allowing the pick-and-place nozzle to remove the part cleanly during SMT assembly.
After the design is confirmed, cavities are punched into the paper tape. Punching accuracy affects both packaging quality and feeding performance. Clean edges, accurate pitch, and consistent hole positions are necessary for reliable downstream use.
Step 4: Adding the Bottom Support Layer
After the cavities are formed, a bottom support layer is added to the paper carrier tape. This layer creates a stable base for each pocket, helping the component stay properly seated during loading, winding, storage, and SMT feeding.
The bottom layer must be applied with accurate alignment and consistent bonding. If it shifts, wrinkles, or does not attach evenly, the cavity depth may become unstable, and components may sit at different heights inside the pockets. This can affect component position, cover tape sealing, and pickup performance during automated assembly.
A well-controlled bottom support layer improves pocket stability, reduces component movement, and helps the finished carrier tape maintain reliable feeding performance throughout the production process.
Step 5: Loading Components into the Carrier Tape
After the carrier tape structure is prepared, components are loaded into the cavities. Depending on production volume and component type, loading may be automated or semi-automated. The main goal is to place each component in the correct cavity with the correct orientation.
During loading, the process must control missing parts, flipped parts, tilted parts, reversed polarity, and poor seating. For non-polar components, orientation may be simpler, but stable position is still important. For polarized components, orientation control becomes much more critical because errors may cause assembly defects.
Good loading equipment and inspection systems help ensure that each pocket contains the correct component in the correct position before the cover tape is applied.
Step 6: Cover Tape Sealing
Cover tape sealing keeps components inside the cavities during storage, handling, shipping, and SMT feeding. The cover tape must be applied with consistent sealing force and alignment. It should be strong enough to prevent component movement but not so strong that it creates peeling problems during automated assembly.
If the seal is too weak, the cover tape may lift or components may move inside the package. If the seal is too strong or inconsistent, the SMT feeder may experience unstable peeling, vibration, or interruptions. That is why peel strength control is an important part of the packaging process.
Cover tape quality, sealing conditions, tape alignment, and process stability all affect the final result. A reliable supplier should be able to control sealing consistency and check peel behavior before shipment.
Step 7: Reel Winding and Final Packaging
Once the components are sealed inside the carrier tape, the finished tape is wound onto reels. Winding tension must be controlled carefully. If the winding is too loose, the tape may shift or become unstable during handling. If it is too tight, the tape may deform or affect component seating.
The reel also includes leader and trailer sections to support machine setup and feeding. Labels are applied with important information such as part number, quantity, lot number, orientation, date, and customer-specific details.
Final packaging may include moisture protection, anti-static bags, cartons, labels, and protective cushioning depending on the component and shipping requirements. The goal is to keep the reels stable and traceable until they reach the customer’s production line.
Key Quality Control Checks
Quality control is essential in the paper carrier tape packaging process because even small inconsistencies may affect SMT feeding, component pickup, or final assembly efficiency. A reliable supplier should check both the tape structure and the packaged components before shipment.
Dimensional inspection is one of the first checks. This includes tape width, pitch accuracy, cavity size, sprocket hole position, edge condition, and overall tape flatness. Accurate dimensions help the carrier tape move smoothly through SMT feeders.
Component placement should also be inspected carefully. Each pocket should contain the correct component, and the component should sit in the right position and orientation. This helps reduce the risk of missing parts, tilted parts, reversed placement, or unstable pickup during production.
Cover tape performance is another important quality point. The cover tape should be aligned properly and peel smoothly during feeding. Consistent peel behavior helps protect the components while keeping the tape easy to use on automated equipment.
Final reel inspection checks winding tension, reel condition, label accuracy, and outer packaging. These checks help ensure the finished carrier tape arrives clean, stable, traceable, and ready for SMT production.
Common Paper Carrier Tape Packaging Problems
Several problems can occur when the packaging process is not well controlled. One common issue is poor cavity fit. Oversized cavities allow components to move, while undersized cavities may cause loading or pickup problems.
Another issue is inaccurate pitch or sprocket hole position. If the tape does not index correctly, SMT feeders may not present components in the right position for pickup.
Weak or inconsistent cover tape sealing can also create problems. Components may move during transport, or the cover tape may not peel smoothly during production.
Component orientation errors are another major concern, especially for polarized components. A wrong orientation can lead to assembly failure even if the tape itself looks acceptable.
Dust, burrs, or paper fibers may also affect packaging quality. Clean punching, controlled handling, and proper inspection help reduce these risks.
Paper Carrier Tape vs Plastic Carrier Tape
Paper carrier tape and plastic carrier tape are both used in tape-and-reel packaging, but they are suitable for different applications.
| Factor | Paper Carrier Tape | Plastic Carrier Tape |
|---|---|---|
| Common use | Small passive components | ICs, sensors, larger or fragile parts |
| Pocket type | Punched cavities | Embossed or formed pockets |
| Cost efficiency | Strong for high-volume small parts | Usually higher cost |
| Component protection | Suitable for stable small parts | Better for complex or fragile parts |
| Custom depth | More limited | More flexible |
| Sustainability angle | Often preferred for paper-based packaging goals | Depends on material and recycling system |
Paper carrier tape is often a practical choice for small components where cost efficiency, stable feeding, and high-volume production matter. Plastic carrier tape may be better when components require deeper pockets, stronger protection, or more complex cavity shapes. The right choice depends on the component, production requirements, and total packaging cost.
How to Choose a Paper Carrier Tape Packaging Supplier
Choosing the right supplier is just as important as choosing the right material. A reliable supplier should provide technical support before production, not only after problems occur.
Look for a supplier that can review component drawings, recommend tape width and pitch, optimize cavity design, and provide samples for testing. Sample approval is valuable because it allows buyers to check cavity fit, cover tape peeling, component orientation, and feeder compatibility before mass production.
Process stability is also important. The supplier should have controlled punching, lamination, loading, sealing, winding, and inspection procedures. Quality documentation, inspection reports, and traceability can help reduce risk for buyers.
Customization capability is another factor. Different components may require different paper thicknesses, cavity designs, reel quantities, label formats, or packaging instructions. A supplier with flexible customization can respond better to real production needs.
What to Provide When Requesting a Quote
To get an accurate recommendation, buyers should provide as much information as possible. Useful details include the component drawing or datasheet, component dimensions and tolerances, orientation requirement, estimated order volume, quantity per reel, tape width preference, pitch requirement, ESD requirement, and any customer packaging standard.
If available, physical samples are also helpful. They allow the supplier to test cavity fit and packaging behavior before confirming production. The more complete the information, the faster the supplier can recommend the right paper carrier tape packaging solution.
Conclusion
The paper carrier tape packaging process includes much more than placing components into a tape. It involves requirement review, material selection, cavity design, punching, bottom support, component loading, cover tape sealing, reel winding, and quality inspection. Each step affects how well the components will perform during storage, transport, and SMT assembly.
For small electronic components, a stable packaging process can reduce feeding issues, protect component orientation, and improve production efficiency. If you need paper carrier tape for your components, choose a supplier that can support custom design, sample testing, stable production, and quality inspection. Share your component drawing, datasheet, or sample details to get a packaging solution that fits your real production needs.



 Emial
Emial John Mr